Tag Archives: recipe

Menu takes the Oscar for Effin Artist

As the Oscar night parties wind down in L.A. and the sun comes up, I bask in my own Oscar, awarded by the Bride for best original menu for an Oscar Party. I pout in the knowledge that The Bride won the ballot 7-5. She only missed on the director. I leaned too heavily on David O.Russell, who frankly keeps getting screwed. If you put four actors in the top four categories two years in a row, you at least deserve a writing award or directing award or something… sigh… Sour grapes, I know.

Let’s revisit my award- winning (in my own mind) food:

Course 1:

IMG_20140302_135439

The roasted mushrooms are stuffed with avocado and pesto. The bread is my old school Italian bread with fresh pomegranate seeds in it, I topped it with roasted tomatoes, drizzled with Webbromance Nudo olive oil. Soooo good.

Course two:

IMG_20140302_162032

This course was toasted raviolis, Nonie’s sauce, and eggplant pizzas. Leave it to me to ruin a wonderful vegetarian pizza (topped with sauce, mozzarella and ricotta) by tossing on some sausage. I loved it though. Love that sausage hit on the top of it all.

Course 3:

IMG_20140302_173148

Steak skewers, roasted peppers, topped with a roasted garlic on the end. These flavors just merged and popped. Really, really worked… simple and beautiful. I grilled the steak with Italian rub. The sweet potato fries got the closest yet in my many, many attempts to crispy fries, but they sort of stuck to the pan too, so the effort continues.

Course 4:

IMG_20140302_182907

These sort of speak for themselves. All homemade. I even broke out the green coloring (cancer fear pushed aside for festive color) to make the mint ice-cream look the part. Soooooo goooood. I haven’t had much sugar in while so this was a blast… a bender… a … Effin delight.

Great night. Great acting, celebrating their art. Great writers getting their due. Great music. Ellen was four-part harmony for hosts.

Oh yeah, and my date was pretty awesome. She didn’t even gloat her victory, but secretly, I know her, she’s pretty damn proud of her Oscar win.

As Ellen said, we’re all winners tonight.

High energy bars loaded with healthy flavor

Like anyone who works out a lot, I love snacks. My natural inclination runs to trail mix and energy bars. Both, however, when purchased at normal stores are both expensive and pretty bad for you. The really good-for-you options are smaller companies where you have to order and those are even more expensive.

Still, choose these over the massive companies, because there are great ones out there, like Oregon-based Picky Bars, for example.

With the Test Kitchen’s recent post-holiday bent toward healthier items, we looked to make our own energy bars with carefully chosen, affordable ingredients. Because of my previously explained Cancer-phobia, I wanted these packed with free-radical fighting foods like sunflower seeds and cranberries.

We landed on a loaded creation that blew our minds with flavor, texture and nutrition. We consider this a “pre-work-out” bar because it’s high in carbs and fat that provide great fuel to burn. But unlike many bars, its absolutely loaded with protein (a whopping 25 grams).

Note: Midway through this recipe you will get concerned that they aren’t coming together. It will look like this:

IMG_20140222_135326

But don’t worry. If you get them too moist they become SOO dense. This lightness now will keep them manageable at the end. They are just so loaded with goodness that they compact into chewy bars once they are finished.

For a post-workout, or evening energy bar, we have an old peanut butter standby that is virtually indestructible once its made and much lower in carbs. We take it on backpacking trips to make sure we have the protein we need.  We have a quick recipe for that at the end of this one, so scan down past the nutrition data if you’re so inclined.

There… the fine print out of the way, let’s get on with them already…

This we call the “Everything Energy Bar.” Try it out for yourself! 

Everything Energy Bar

Ingredients:

Instructions:

  1. Prepare 8×8 baking dish lightly with grapeseed oil. Preheat oven to 350.
  2. Mix dry ingredients together
  3. In stand mixer combine peanut butter, eggs, oil, brown sugar and vanilla.
  4. Mix together the dry and wet. The batter will be crumbly.
  5. Dump in the various goodies (berries, nuts, etc…. optional coconut flakes, because I love raw coconut).
  6. Work the batter through your fingers to combine thoroughly. If necessary, use one more tablespoon of grapeseed oil. Form into a sort of dough ball.
  7. Smoosh lightly into the pan to form up, but not totally smash into the bottom of it. Go for a balance between combined but not smashed. Press the edges a bit to firm them up around the pan.
  8. Bake for… (honestly I keep forgetting to time it, but I think it was 18 minutes. You should trust me anyway… check them and when your tester comes out MOSTLY clean, your done. They’ll finish cooking in the pan.
  9. Melt chocolate and drizzle in stripes diagonally across the top of the bars.
  10. Let cool for 30 minutes. (You’ll be worried they are too airy and potentially even crumbly, but don’t fuss).
  11. Cover with cling wrap and put in fridge overnight or for a couple of hours to thoroughly cool.
  12. Take out and cut into bars, wrap individually and store in airtight container.

9 Servings – Nutrition data by sparkpeople.com! very easy to use. Try it.

Amount Per Serving
  Calories 454.2
  Total Fat 17.7 g
  Saturated Fat 3.1 g
  Polyunsaturated Fat 4.0 g
  Monounsaturated Fat 1.3 g
  Cholesterol 0.0 mg
  Sodium 213.5 mg
  Potassium 406.4 mg
  Total Carbohydrate 56.0 g
  Dietary Fiber 7.3 g
  Sugars 15.7 g
  Protein 24.9 g

OK… Our go-to, work-horse Peanut Butter energy bar revises the old Peanut Butter Smoosh Balance bar before it got all big and fancy and store bought. This is a take-off from the old-school folks who figured out the 40/30/30 (carb/protient/fat) diet is a pretty good way to go (and still is, though I hate how commercial the “Balance Diet” has become, and won’t buy their products.

Anyway, this one is simple, and I took out a bunch of the honey to keep the sugar content low. The last batch of these I made for a backpacking trip in November and finished off the last of the bag in January. They keep forever … well not like Twinkie forever, but you get my meaning.

Peanut Butter Smoosh Energy Bars

Ingredients:

  • 1 cup oats
  • 1 cup Effin Artist peanut butter
  • 1 cup whey protein
  • 1/2 cup (or less, just enough to make all this stuff stick) of honey.
  • 1 tsp salt
(add dried fruit if you want as it comes together, or mix in some dark chocolate to make them even more flavorful. You can do about anything with this base mix).
Instructions:
  1. Smoosh it together until it forms a cohesive blob.
  2. Line wax paper on a 8×8 cake pan and press the bars into the pan flat.
  3. Allow to set for an hour or two.
  4. Slice into bars or transfer to a freezer bag as a whole, then you just rip off a chunk when needed.
A couple of notes about this nutrition data. I left it at nine servings so you can compare the nutrition of this bar and the one above, but frankly, you never eat that big of a serving of this bar. It’s too dense and filling. I’d say realistically its 18 servings.  But as you can see the carbs are cut in half and the balanced protein/fat/carb ratio comes through. I’ve never liked how much honey ramps up the grams of sugars, but haven’t come up with another virtually un-spoilable ingredient that can form these together. Any ideas? I’d love it because these don’t really need the honey to be good. Any way, read on and enjoy:9 Servings
Amount Per Serving
  Calories 519.8
  Total Fat 30.2 g
  Saturated Fat 5.3 g
  Polyunsaturated Fat 0.0 g
  Monounsaturated Fat 0.0 g
  Cholesterol 53.8 mg
  Sodium 303.1 mg
  Potassium 162.3 mg
  Total Carbohydrate 28.7 g
  Dietary Fiber 4.0 g
  Sugars 18.9 g
  Protein 30.4 g

Blueberry Coconut Bran Muffins a personal favorite

I’m partial to real, unsweetened coconut. I made a coconut bread once I still think is among the best thing’s I have stumbled across in my test kitchen. I made a coconut doughnut as well. It’s a nutty flavor I never liked as a child, but really like now. I’m constantly sneaking it into stuff, like my latest bran muffin experiments. Though the Chocolate Peanut Butter Bran Muffins were the best nutritionally, and the Cranberry Banana Bran Muffins were the winner of the taste tests with those who sampled them, these remain my favorite.

Here’s how to make them:

Ingredients:

  • 1 cup all-purpose flour
  • 1 1/3 cup bran
  • 1 tsp baking powder
  • 1 tsp salt
  • 1 tsp baking soda
  • 1/2 cup unpacked brown sugar
  • 1 egg, lightly whipped until combined
  • 1/2 cup coconut water
  • 1/2 cup whole milk
  • 1 tsp vanilla extract
  • 1/4 cup plain greek yogurt
  • 3/4 cup dried, unsweetened blueberries
  • 1/2 cup shredded coconut, some reserved

Directions:

  1. Prepare muffin pans by greasing sides lightly with butter. Preheat oven to 350 degrees.
  2. Mix dry ingredients together in a bowl.
  3. In a stand mixer combine oil, egg, brown sugar, milk, water, yogurt and vanilla, just until blended, about one minute.
  4. Fold wet into dry until combined, then fold in the blueberries and coconut.
  5. Pour batter into muffin pan, nearly full so they will rise and become very big.
  6. Top with thick flakes of coconut, decoratively
  7. Bake for about 18 minutes, but watch carefully. Check with tester and remove promptly when dough has clotted and the tester comes out nearly smooth.
  8. Let stand for five minutes then remove from pan to a wire rack to cool.
  9. Best served warm but kept well for several days. Can be frozen as well.
Nutrition Facts 

  9 Servings 
Amount Per Serving
  Calories 234.1
  Total Fat 11.0 g
  Saturated Fat 8.8 g
  Polyunsaturated Fat 0.4 g
  Monounsaturated Fat 0.8 g
  Cholesterol 21.8 mg
  Sodium 143.2 mg
  Potassium 108.7 mg
  Total Carbohydrate 36.3 g
  Dietary Fiber 2.3 g
  Sugars 18.6 g
  Protein 4.6 g

Chocolate Peanut Butter Bran Muffins surprisingly tasty, low in sugar

We originally set out to make a bran muffin taste like a snickers bar, and do it with very little sugar. It didn’t really work, but we did discover you can make caramel from nothing but sweet potatoes and water and its very passable, which we will surely employ in our upcoming Energy Bar Test Kitchen.

Eventually we circled back to a classic Chocolate Peanut Butter Bran Muffin. This might be our best creation because its BIG, its filling and its loaded with protein. Each muffin has only 230 calories, and 8 grams of sugar. Just 24 carbs for any muffin is pretty low. The peanut butter pushed the fat grams to a tolerable 8 grams and made it very tasty.

Here’s how to make it:

Ingredients:

  • 1 cup whole wheat flour
  • 1 cup bran
  • 2 tsp baking powder
  • 1 tsp salt
  • 2 tbls dark, unsweetened coca powder
  • 1 cup chocolate whey protein powder
  • 1/2 cup unpacked brown sugar
  • 1 egg, lightly whipped until combined
  • 1/2 cup whole milk
  • tsp of vanilla extract
  • 1/2 cup natural EffinArtist Peanut Butter (ok, any natural PB without sugar will do).
  • 1/4 cup plain greek yogurt

Directions:

  1. Prepare muffin pans by greasing sides lightly with butter. Preheat oven to 350 degrees.
  2. Mix dry ingredients together in a bowl.
  3. In a stand mixer combine peanut butter, egg, brown sugar, milk, yogurt and vanilla, just until blended, about two minutes.
  4. Fold wet into dry until combined.
  5. Pour batter into muffin pan, nearly full so they will rise and become very big.
  6. Bake for about 18 minutes, but watch carefully. Check with tester and remove promptly when dough has clotted and the tester comes out nearly smooth.
  7. Let stand for five minutes then remove from pan to a wire rack to cool.
  8. Best served warm but kept well for several days. Can be frozen as well.

For the best tasting, lightest Bran Muffins you’ve ever had check out the Cranberry Banana Bran Muffins we also made in the test kitchen.

Nutrition Facts 

  9 Servings

Amount Per Serving
  Calories 230.7
  Total Fat 9.5 g
  Saturated Fat 2.0 g
  Polyunsaturated Fat 0.5 g
  Monounsaturated Fat 0.5 g
  Cholesterol 43.4 mg
  Sodium 210.0 mg
  Potassium 105.4 mg
  Total Carbohydrate 24.9 g
  Dietary Fiber 3.9 g
  Sugars 8.5 g
  Protein 15.1 g

Cranberry banana bran muffins fit the healthy bill

The test kitchen’s pursuit of the perfect bran muffin proved one of the more difficult challenges we’ve tackled. We started with all kinds of crazy ideas, that included making sweet potato caramel for frosting (which is a very good idea, but not quite right for these muffins), using lots of greek yogurt for moisture, and even baking/frying the muffins at the same time in coconut oil (sounds weird, because it was, but dang those little guys were tasty).

Eventually we circled back to a more minimalist pursuit, a less-is-more strategy that brought about the desired results. We ended up creating three bran muffins from scratch: the Chocolate Peanut Butter Bran Muffin, The Blueberry Coconut Bran Muffin and the Cranberry Banana Bran Muffin.

2014-02-13 16.51.07

We will post the recipes and calorie information for all three, but we decided to start with the true winner, the best of the best, the Cranberry Banana Bran Muffin. It turned out so good we felt guilty eating it. But with 13 grams of protein, only 228 calories and 1 gram of fat, these big fatty muffins fit the bill of both tasty, moist and good for you (though admittedly both the sugars and carbs came in higher than on the other two when we ran the nutrition data).

Here’s the recipe:

Ingredients:

  • 1 cup cake flour
  • 1 cup bran
  • 2 tsp baking powder
  • 1 tsp salt
  • 1/3 cup whey protein powder
  • 1/2 cup unpacked brown sugar
  • 1 egg, lightly whipped until combined
  • 1/2 cup whole milk
  • 1 banana, mashed
  • 1 tsp vanilla extract
  • 1/4 cup plain greek yogurt
  • 3/4 cup dried, unsweetened cranberries

Directions:

  1. Prepare muffin pans by greasing sides lightly with butter. Preheat oven to 350 degrees.
  2. Mix dry ingredients together in a bowl.
  3. In a stand mixer combine banana, egg, brown sugar, milk, yogurt and vanilla, just until blended, about one minute.
  4. Fold wet into dry until combined, then fold in the cranberries.
  5. Pour batter into muffin pan, nearly full so they will rise and become very big.
  6. Bake for about 18 minutes, but watch carefully. Check with tester and remove promptly when dough has clotted and the tester comes out nearly smooth.
  7. Let stand for five minutes then remove from pan to a wire rack to cool.
  8. Best served warm but kept well for several days. Can be frozen as well.

Nutrition data from Sparklepeople.com, which was WAY easier than nutritiondata.com (they have some serious kinks to work out. I’ll just leave it at that).

Nutrition Facts
  9 Servings
Amount Per Serving
  Calories 232.5
  Total Fat 2.2 g
  Saturated Fat 1.1 g
  Polyunsaturated Fat 0.2 g
  Monounsaturated Fat 0.3 g
  Cholesterol 47.7 mg
  Sodium 430.8 mg
  Potassium 176.2 mg
  Total Carbohydrate 44.7 g
  Dietary Fiber 2.3 g
  Sugars 14.9 g
  Protein 14.0 g

Alfredo you can count on at the last minute

After you’ve spent a few hours nurturing and crafting your homemade pasta, the last thing you want to do is labor over the sauce.

That never seems to stop me, because I forget how I don’t want to labor over the sauce. So it is usually the last thing I do. As a result, I’ve developed a fairly straight-forward, very flavorful alfredo that I can whip together — last minute — and not ruin the homemade pasta-making effort.

Here’s the recipe:

Fettuccini Alfredo

Ingredients:

  • 3 tbsp butter
  • 3 garlic clove, minced
  • ½ tsp. chili powder
  • 1/8 tsp. of nutmeg
  • 2 cups heavy cream
  • ½ cup grated parmesan cheese
  • ¾ cup grated mozzarella
  • Splash of fresh lemon
  • Freshly chopped Italian Parsley, basil and sage
  • Salt to taste

Directions

  1. Melt butter in medium pan
  2. Add the garlic, chili powder, nutmeg and sauté for 2 minutes
  3. Add cream and bring to a simmer, stirring often
  4. Add parm cheese and let thicken, about 8 minutes
  5. Stir in mozz cheese, until blended smooth and thick, if too thick add a tbsp of milk
  6. Finish with splash of lemon; fold in fresh herbs until blended. Serve over pasta immediately

Notes: the mozz isn’t essential. It thickens it and gives a soft contrast to the harsher parm, so I use both. But this sauce is pretty good no matter what you toss in it. For example, you can skip the folded herbs and just mix in pesto into the spices before the cream is added and make a creamy pesto. You can use sun-dried tomatoes. You can use chopped green olive. It’s really fun to experiment.

Enjoy.

Recipe: The art of old school fettuccine

A couple of days ago I extolled the virtues of making your own pasta. Then it dawned on me that what if… just what if, someone read that and thought, “you know what?! I’m going to try it.”

I felt an immediate twinge of guilt because I know what lies ahead. Google “making pasta” and you’ll get a ton, A TON, of recipes that say, “it’s so easy!”

Well, it’s not.

But do not be discouraged. Remember the wise wisdom of Jimmy Dugan? Say it with me now, “if it was easy, EVERYONE, would do it! It’s the hard that makes it great.”

So I decided to add one more recipe to the incessant clutter that tries to walk you through the steps of making your own pasta, and to do it realistically.

For starters, let me be specific about this hard/easy thing. It is easy once you get the hang of it. Pasta has only four ingredients. You can’t really screw it up, so even your less-than-Effin-Artistry pastas will taste good. We love eating our failures in the Test Kitchen.

The hard is in the artistry. Learning the feel of the dough. Learning to roll it consistently. Learning how far is too far to let it dry. This is a long recipe that goes into all the pitfalls. You only have to read it once. Then boil down the key parts when you make it. I hope it helps you have an enjoyable successful time of it.

I am still evolving in all of this. But I’m getting better. I keep at it. So follow these steps and enjoy. I couldn’t be more thrilled if you try making dough on account of these posts. And please, click in the reply and let me me know the good, bad and the ugly of your work. If I screw you up here, I want to hear about it!

Let’s get started.

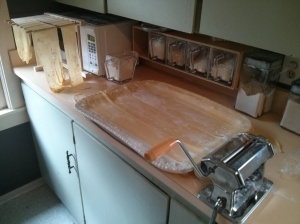
1) Make room. – pasta is not meant to be confined. Clear the counter tops, remove the knicknacks and give yourself a good, clean work space. As you can see here, I have a massive Italian made platter I use and even that doesn’t keep it all contained.

IMG_20140210_123329

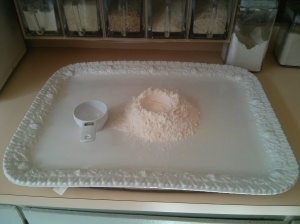
Next: pour two cups of flour and a hefty teaspoon of salt in the middle of your work area. Right on the counter is fine, or in a large glass bowl, or like I did on my platter.

IMG_20140210_123821

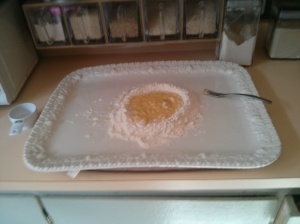
Then crack two eggs into the well. Let’s take a minute to talk about this well thing. First time I did it, poosh, the hens broke out of the chicken coop and raced down my sloped counter to hide underneath the God forsaken microwave. That’s when I decided to use the platter to guard the eggs from escape. Since then I’ve gotten better at the well. The key is to use your other hand to swoop the edges as you mix the eggs up. It’s a bit tough to explain, but as you slowly whip the eggs you incorporate part of the dough with the right hand. With the left you push up the edges of the well to keep it all contained. If you run out of room, push down in the middle of the well to compact it a bit and have it all sink down deeper into the well. Make sense? If not, reply below and I’ll make a video or something. It’s not hard… just takes practice! Or maybe I’m just a slow learner.

Next, put four tablespoons of hot water into the well. (Remove your rings… they get all buggered from the dough and never clean up right). Now push from the outer edges into the middle. I use my fingers like a rake dragging the thing into a pile like I’m piling up leaves. It gets a bit messy here, which is really fun. Once it starts to come together start to shape a ball. I like to add two more tablespoons of water here just to make sure it all incorporates. I prefer sticky dough to dry because its easier in my opinion to add flour as I knead it then it is to add water.

Next, knead.

Next, knead.

Next, KNEAD. A word about kneading. A mindset is needed when it comes to kneading. This is the stuff. This is not a chore. Don’t try to avoid it. Embrace it. Get those hands working, smooshing and bashing and pulling and patting and let your mind fly to whatever heights it needs to climb, unfettered by the chaos of the day. So many recipes try to avoid kneading. They use food processors and dough hooks and “no-knead” tricks. But kneading is just playing with Play-Doh, which we did for hours as a kid.

I’d go about ten minutes. There’s no specific time here. This is the thing that will evolve over time. Eventually you’ll notice the dough turns more silky than grainy and that’s what you want.

NEXT: This is important if you ask me and I’ve never seen it explained in a recipe. Make a dough ball. Sounds easy I know, but when I was 15 and worked in a Mafia-owned pizza parlor, they wanted the dough a certain way and we made sure we did it the way THEY WANTED IT. Turns out this was important. They wanted it with no broken edges so when you toss out the pizza, the crust stays together. To do this you have to form a good, cohesive dough ball. I liken it to tying off a balloon. Wrap your right hand thumb and forefinger in a loop around the mid-section of your dough ball. Then softly twist the dough in your hand as you bring your thumb and finger together toward the top of the dough ball. You’ll end up with what looks like the end of a balloon at the top. Push this into the dough and smooth it out. Whaalla. You’ll have a seam-free dough ball. (If someone is so gracious as to try this, please contact me and let me know if this A) made sense, and B) worked?!)

IMG_20140210_130128

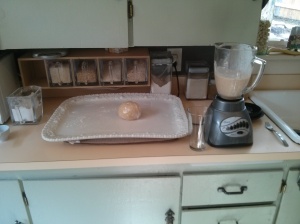
Now take the dough and wrap it in plastic for an hour. This is perfect break time, which as you can see above, I used to make a powerhouse energy smoothie! Delish.

An hour later break out the pasta roller. I prefer the kind here, a simple old-timey gizmo with a hand crank. I know there are all kinds of motorized ones, but I like my dough to be machine-free. Here’s where you take advantage of all that space you cleared. Divide your dough balls into six different ones all about the same size and weight in your hand. You can feel that they are close enough. I again go back and make perfect little dough balls,”tied” off at the top, six more times because I like playing with dough and those scary pizza parlor guys banged it into me.

Once you have the dough balls cover them back up with the plastic wrap to keep them from drying out while you work the dough into sheets.

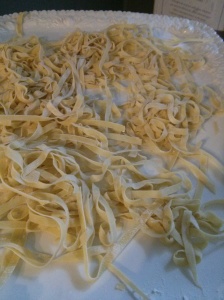
The basics of working into sheets is straight forward. Set the machine to the widest slot and run the dough ball through four times. This just wakes up the dough. I have learned to take a bit of care to send it through the machine straight. This helps keep the sheets straight at the end. Ruler straight isn’t necessary. Some waggle is fine and creative looking. We’re not machines. Our pasta should reflect it. Crank the machine down a notch at a time until you get to the second notch. Now you’ll have a nice long sheet of pasta running from one hand through the crank and caught by the other hand. Lay it out on the platter or counter or hang from the rack and dust it in flour. DONE! (Note: I’ve done some stopping at the third notch so they have a bit more chew and actually I like it. But officially, whatever that is, fettuccine is supposed to be on number 2. You decide!)

Do this five more times with the next five balls. If something goes awry don’t sweat it. Mash it all back into a ball and start over. It’s pretty forgiving.

IMG_20140210_145544

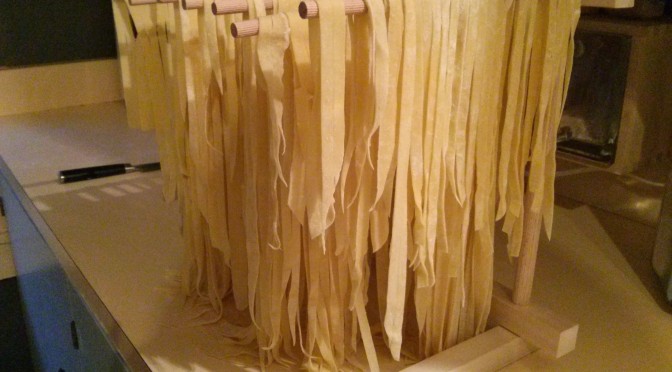
Notice I’m using a pasta rack to dry the noodles, but you don’t have to. I go back and forth. I prefer to just lay them on my platter, dust them with flour and put a tea towel (tea towel… HA… I’ve been reading too many recipes. What the hell is a tea towel? I use dish rags my daughter dyed to make pretty) over them. But I do use the rack too. Either way. (Shrug). In fact, I used both ways this time.

Here’s one of those key things they don’t tell you. You want the dough to sit a bit before you cut it. It stiffens which makes it easy to cut and less sticky when you’re done. BUT don’t let it get hard. Stiff, but not hard. Got it? Probably not, but once you do it a couple of times you will. Hard will crack and splinter going through the cutter. Stiff will cut delightfully.

One at a time slide the pasta sheets through the cutter part of your pasta roller. (If you want to be artsy here you can cut them with a big chef’s knife and make them different widths, which is pretty cool, but eh… I like the crank-y cutter thing). I like to drape the pasta off the machine so I can crank with one hand and catch the pasta with the other. This is not necessary. You can let it all drop as it cuts. But I like to catch it so I can lay it out on the big platter and dust a bit more flour on it so it all doesn’t stick. When I do this I feel like I’m being unnecessarily anal. So take it for what it’s worth.

IMG_20140210_163100

Once its all cut put some flour on your hands and riffle through the pasta lightly letting it all fall spread out on the platter or counter or a baking pan, sort of like your fluffing through hair. This helps the sticky ones fall apart and keeps them from globbing up in the water.

Now the water. Let’s get serious here. This is important. Don’t use a small pan. I don’t get this whole chuck pasta in water and that’s all there is to it thing. You need a big pan of water. You need a pretty healthy pile of sea salt. You need that water to get to a roiling boil. Don’t do anything until you have those three things. Then you slide your noodles into the water, give them a swirl and let them be for about three minutes.

Take a 1/2 cup of the starchy water out of the pan before you dump it. Then strain the noodles. Don’t rinse them because the starch helps the sauce stick.

Then put the noodles back in the big pan and let them just briefly feel the heat of the bottom of the pan. Then put some of the reserved water as they cook. Next add the sauce and let it heat together for a minute before serving.

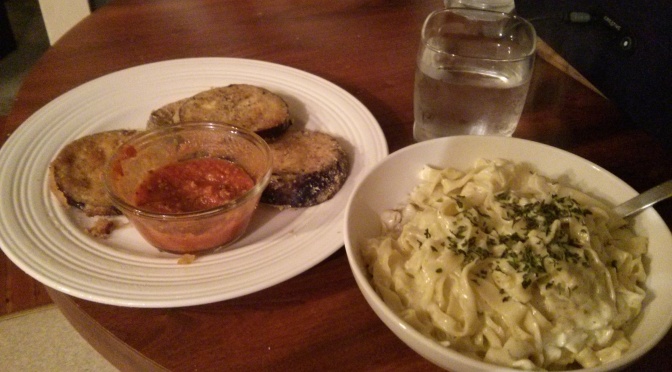
Sauce? What sauce you say?

I’m glad you asked. Check back in a couple of days for a good Alfredo sauce recipe.

A match made in web heaven — Rosemary Apple Rings

When I enter my kitchen, I am happily surrounded by my roots. Every day I am reminded of who I am.

My grandparents worked from poverty to affluence by spending decades, six nights a week cooking in their restaurant. It started as little more than a pool hall in an out-of-the-way town on the Redwood coast of California.

IMG_20140120_104957

Then it grew. They moved it and built a place that would become a regional favorite.

IMG_20140120_103711

As a child, my grandmother babysat my brother and me in her kitchen. I am proud of the splatter-burn scars on my foot I picked up one day in her kitchen, though I’m sure Nonie and my parents were none to pleased to have a toddler howling like a devil with a burn on his foot. I’m glad it happened; it’s a momento to my heritage.

The Big 4 Inn was a Northern California landmark. When my grandmother finally sold out to make way for Interstate 5, the San Francisco Chronicle documented its passing into history. The menus and the napkins and photos of the Big 4 still decorate my kitchen. The recipes are the staple of my cooking, the heritage I pass along to my children and know they will pass along to theirs (if they’d ever buckle down and give me grandkids, damnit).

The Big 4 was beloved, Twenty years after it closed I met a guy in passing in another state. We swapped a few stories. We were both italian. We both had roots in Humboldt County. I mentioned the Big 4. His jaw dropped.

“My God, that was your nona?” he said.

I nodded proudly.

“I swear to God I still taste those raviolli’s in my mouth. I can still taste them, you know. Do you unnerstand?”

I did. I still do to. It was that kind of place.

As an appetizer my grandparents served apple rings with every dish. I grew up on these apple rings. Something about them, to me, goes perfect with the heavy meat sauce Nonie Mary was known for and I still do my best to replicate.

Anyway, I say all this becase I decided to bring back the apple rings the other day when I entered a contest to win some olive oil from my latest WeBromance. I mentioned there were two contests. Nudo’s rosemary olive oil and Nonie’s apple rings seemed like a match made in heaven.

For those keeping score at home, here is my entry in the second one. Try it. The apple rings are wonderfully simple and you’ll experience a small taste of what made The Big 4 Inn truly a magical place.

Rosemary infused apple rings.
Ingredients :
– Nudo Italia Rosemary olive oil
-Four granny smith apples, peeled and cored.
-1 cup 00 flour
– up to 1/4 cup 1/2 n 1/2 cream
-1 egg
– 1 tsp vanilla
-1 tsp salt, a dash of dried rosemary
– confectioner sugar for dusting

Directions
1) put flour in a bowl and create a well. Mix in a hint of dried rosemary.
2)crack egg into the well along with salt and vanilla.
3) use a fork to mix egg gradually incorporating some of the flour.
4) slowly add in cream until batter forms. Should be like pancake batter. Use a couple of tbls of milk if it’s too thick.
5) heat olive oil in a skillet on medium.
6 ) slice apples about 1/2 inch thick. Coat the apples in the batter holding aloft to allow excess to drain off.
7) put apples gently into heated oil. Cook until lightly browned on both sides. Transfer to a paper towel. Lightly dust with confectioner sugar. Repeat until all the rings are cooked.
8) arrange on a platter in a circle. Scoop ricotta cheese into the center for optional topping.
9) serve while still warm.

The perfect dough for the imperfect cause

I’ve been fiddle futzing with pizza dough for a long time. Friday night pizza night in our house has been homemade for a decade at least. My youngest has been smooshing dough since she was five. She’d toss it so hard it’d rattle the overhead light fixtures in the kitchen.

My bride keeps telling me how great it is. She doesn’t know I never ever make it the same way twice. I haven’t found the perfect dough yet, so I keep monkeying with the recipe.

Until, perhaps, now. This last Friday night I made the closest batch yet to the perfect dough. It was light and airy, yet still packed an aldente bite when I bit down. It didn’t get too hard. It was thin, but with a nice airy crust on the edge that tasted like a seasoned bread stick.

I could stop tinkering and have my dough. But as I said, perhaps. I’m not sure yet. It’s really, really great, but perfect? Hmmnn…

Perhaps, as today is another Pizza Night. We’ll see.

Nevertheless I thought enough about this dough to enter it in a contest hosted by my latest WeBromance, NudoAdopt.com.

The fine folks at Nudo artistically experiment with infused olive oils. I read about how they grind the rosemary with olives at the press, rather than soak the rosemary with oil, and I though, “Wow, they’re EFFin Artists, man!”

Then my oldest told me they were having a contest, casting about for recipes that use their rosemary olive oil and an experimental olive oil they made combining coffee beans with the olives. If you’ve followed me at all in the Test Kitchen, you know damn well I’m in awe here. Coffee olive oil, not infused to so to speak, but actually conceived in a blend before the birth of the oil. And a contest to boot?

I was speechless really. Then my daughter challenged me to submit my recipe ideas. I went from speechless to obsessed. I winnowed down several ideas. My daughter and I texted back and forth, all the while I smashed my perfect dough in my hands, pulling the zen artistry out of it.

I had to make a coffee pizza I decided. I seriously wanted to win this thing, just to connect with the artistry of my latest WeBromance. We’ll see. I’m saying a few decades of the rosary just to help the cause. (Note: the pizza pictured above is not this one. I forgot to take a picture of this and I didn’t have the actual coffee olive oil, which I hope to get when my Web crush folks at Nudo pick me, pick me! and send me some. I’ll post a real photo then, scouts honor).

My daughter helped create this. Here is the recipe we came up with, including, my nearly perfect dough.

Coffee Chicken Pizza

For the dough

  • 1 cup seminolla flour
  • 1 cup OO flour
  • 1/2 tsp salt
  • 1 tsp sugar
  • 3/4 cup warm water
  • 2 1/4 tsps of active yeast.
  • 3 Tablespoonns Nudo Coffee infused olive oil

For the white sauce:

  • 3tbs butter
  • 2 garlic cloves
  • 1/2 tsp chili powder
  • 1/8 tsp of nutmeg
  • 2 cups heavy cream
  • 1/2 cup grated parmesean
  • 3/4 cup mozzerella cheese
  • splash of fresh lemon
  • Fresh chopped italian parsley
  • pinch of salt

For the pizza

  • 2 cloves roasted garlic
  • 1 cup ricotta
  • 1 cup or so of romano cheese
  • 1/2 cup esspresso
  • 1 grilled chicken breast, shredded
  • 1 diced tomato
  • 1 tbls of red chili flakes
  • 2 tbls of coffee-infused olive oil by Nudo

Make the dough at least two hours ahead by:

  1. Mix flours, salt and sugar in a glass bowl.
  2. Mix warm water and yeast and let stand for 6-8 minutes until disolved
  3. Pour olive oil and water/yeast into flour. Swirl into a ball.
  4. kneed until smooth, adding a little flour as needed.
  5. Oil up the bowl, put the ball in it and cover to rise.

To make the sauce:

  1. Melt the butter and sautee the garlic, chili powder and nutmeg, 2 minutes
  2. Add the cream and bring to a simmer. whisk often, for 2 minutes
  3. Add the parm cheese and whisk often. Simmer 5 or so minutes more until thickens.
  4. Add the mozz and whisk until smooth.
  5. Add the splash of lemon, salt and fold in parsley. Keep warm. (you’ll have extra for alfreado in coming days)

To make the pizza

  1. Whip the coffee into the ricotta, using more ricotta or a bit of cream cheese if it gets too runny. Set in refrig until needed.
  2. Treat pizza stone with light dusting of cornmeal and warm up in oven, heated to 500 degrees.
  3. Hand toss pizza to make thin crust with thicker rounded edge. Spread out on a pizza board or the stone (careful not to burn yourself and work quickly if you do this option).
  4. coat with a thin layer of white sauce
  5. cover with a thin layer of thick- shredded romano cheese
  6. Drop dollops of coffee-flavored ricotta throughout
  7. Sprinkle shredded chicken, diced tomatoes, roasted garlic and chili flakes over the pizza.
  8. Drizzle coffee-infused olive oil over the top of everything.
  9. Slide onto pizza stone for 10-11 minutes.
  10. Let cool for five minutes before cutting and serving.

WINNER, Winner Chicken Dinner? Come on Nudo… don’t break my heart!

As it turns out… we won! Coffee and rosemary flavored olive oil on the way. I love it when a WeBromance works out like a rom-com starring Adam Sandler.