Category Archives: recipes

Power up with tropical smoothie

I used to love mixing drinks. But now — fast approaching my five-year anniversary of sobriety — I am pretty much relegated to cream in my coffee and a lemon in my club soda. It’s not very exciting.

So on occasion I put a little extra umph in my smoothie making.

Ever since Jamba Juice became a national player, people have flocked to smoothies as a healthy alternative to eating a good way to load up on essential vitamins and other beneficial foods. But most smoothies are also loaded with calories and sugar, which diminishes the benefits significantly. I still love Jamba Juice on occasion but I try to stick to my own smoothies where I can curtail the sugar and push toward a higher balance with increased fats and proteins along with the inevitable carbs.

I do this by infusing the smoothies with vegetables whenever I can. I also never add sweeteners like honey, allowing the fruit to do that work. I use plain Greek yogurt instead of any flavored kind. I also pack in the protein powder and other powerhouse superfoods like flax seeds, chia seeds and others.

It all combines to make a more balanced, effective smoothie that rewards the bride and I after a hard workout or long run.

Here’s the latest one I concocted:

Ingredients:

  • Fresh pineapple
  • frozen mango chunks
  • one banana
  • coconut water
  • grapefruit juice
  • half an avocado
  • chia seeds
  • protein powder
  • dash of salt

Vegetarian lasagna: vegetables and herbs shoved into old standby

Two things have surfaced in this blog of late:

Both came into play for dinner last night with vegetarian lasagna.

The whole idea is something of an abberation for me. Lasagna is really my first recipe. I didn’t make Nonie’s. I crafted my own and let it evolve. For more than two decades it has been the go-to-meal for company when I want to impress without the in-the-moment fuss. Plus, I’ve seen the reaction of maybe 100 people who  have tried it. Unless some were great actors, I can say 100 out of 100 love it. It’s became a not-so-secret pride.  A lot of people tout their lasagna. I smirk. I secretly wish things like a Lasagna cook-off at the county fair existed knowing I’d take the blue ribbon every time.

If our kids have a “family” meal, they’d likely all say lasagna.

So I don’t like to mess with it.

But in the spirit of the aforementioned two areas of focus and the prompting of the bride to mix it up for her class, I relented. I changed my lasagna  to a vegetarian lasagna for a one-night, impromptu test kitchen.

I was flying without net, and it didn’t suck.

Who doesn’t love the sight of a big pile of coarse-chopped basil?

IMG_20140424_190058

If you’re trying to work more produce in your meals, use this recipe. If you want the medicinal value of excellent herbs like garlic and basil, then you get a double bonus with this one.

IMG_20140424_191235

If you simply want to eat some great food with not too much hassle, well, it’s a grand slam. Enjoy.

Roasted Vegetarian Lasagna

Ingredients:

  • 16 oz. Ricotta cheese
  • 1 Eggplant, sliced into 1/4″ rounds
  • 1 red pepper sliced long
  • 1 green pepper sliced long
  • about 6 cloves of garlic, roasted
  • About half a bundle of basil – coarse chop
  • 10-12 sage leaves – fine chop
  • chopped Italian parsley – coarse chop
  • half a block of cream cheese – softened
  • 1/2 a cup of bread crumbs
  • 1 cup of grated asiago cheese
  • grated Parmesan cheese
  • Effin Artist marinara sauce (or recipe of your choice)

Directions:

  1. Coat all the vegetables with olive oil, salt, pepper, garlic powder and chili powder (optional).
  2. Grill the eggplants and peppers until slightly blackened and roasted (or roast on a cookie sheet for 20 minutes). Onions optional (I love them, the Bride doesn’t, hence no onions).
  3. Remove and dice the peppers.
  4. Mix the ricotta and the cream cheese with the sage leaves, diced roasted garlic and the bread crumbs — smoosh with your hands until combined.
  5. In an 8×8 pan coat the bottom with sauce. Layer eggplants as the base. Spread the cheese mixture on top of the eggplant. Sprinkle the peppers. Add a layer of the coarse basil and parsley.
  6. Repeat the above if your pan isn’t close to full, but one layer is usually enough.
  7. Cover with sauce, top thickly with asiago and sprinkle over that with parm. *(tip: I’d dust in some more bread crumbs to soak up the moisture from the ricotta and vegetables).
  8. Bake at 350 degrees for 35 minutes. Let stand for 10 minutes and serve with Effin Artist Garlic Bread and hot-pan, quick sauteed green beans.

Breaking down slow cooker bias for Korean ribs

Let me be clear: I don’t like kitchen gadgets. I like cast iron and a good pot. I like my ancient meat grinder and to knead my own dough. And I especially don’t like gimmicks.

Sure, I’ve drunk dialed Ron Popeil at 3 a.m. and was shocked to see what we affectionately called “The Spinner” arrive at my door a could of weeks later. I loved that rotisserie. I confess. I was sad when it finally fell apart and ended up in a garage sale.

And I’ll confess, I still have the Turbo Cooker. These are remnants. Reminders of my complicated pre-sobriety life of excessive work, excessive ambition and excessive booze; reminders too of late-night drunk dialing.

I’ve rid myself of most gadgets. One that for some reason never got the boot was The Bride’s slow cooker. Let’s be clear: slow-cooker= gadget. I grew up with dinner being dumped into the godforsaken thing as we all hurried off to work or school and had it dumped onto a plate when we all hurried back home at the end of the day. No thanks.

So we’ve had the damn thing for at least five years. Our kids bought it for The Bride for a mother’s day present because, well, they must hate me. They know The Bride doesn’t cook. They knew she’d love the idea of cooking with a slow cooker. They knew she’d never move past the idea stage. And I was left to find a spot for the thing in my kitchen. There it sat.

Until… sigh… last week. For reasons I still don’t understand — I blame aliens seizing my mind — I decided to use the slow cooker for a new Korean Ribs recipe I wanted to try. The recipe was half stolen, half created. I like my own approach to Asian spices, so I usually venture off the map. But the original recipe convinced me to try the slow cooker.

The ribs were beautiful from “Dinner” my locally raised steer.

IMG_20140318_073945

Knowing the slow-cooker would basically turn them into a dull, listless grey, I pumped up the barbecue at 8 a.m. and seared them.

IMG_20140318_075057

Next I dumped my spices into the blender and gave them a whirl. Here’s what I recommend: A pear, a chunk of ginger, two cloves of garlic, soy, chili powder, onion powder, chicken broth, parsley and rice vinegar.

IMG_20140318_080109

Finally, I poured it all into the slow cooker and started my day.

An hour later I check on it. I growled.

“How do you know if this damn this is even on?”I snarled into the other room to The Bride.

She offered some lame commentary, because let’s be real, she knew less about it than I did. I felt like a culinary traitor.

An hour later I checked inside the lid. Steam greeted me.

“Well, it’s on,” I groused to myself.

And so the uncomfortable day went until soon the aroma of my sauce meeting meat filled the house. I fired up the skillet for an arsenal of vegetables. I pulled the ribs out and they nearly fell tenderly off the bone. I served the sauce on top.

It was delicious.

“See I told you I loved the slow cooker,” The Bride said taking a bite of the ribs.

I sighed deeply and said nothing. She smiled up out of the corners of her mouth, relishing this moment.

I still hate the slow cooker, but it can keep its place on the rack in my kitchen because there will surely be another time when I break down and use the gadget.

I won’t like myself, but I sure as hell liked the food it cooked up, which, begrudgingly, is good enough for me.

Old school eggplant serves up fresh flavors

With Spring sprung, I’ve been trying to smash as many vegetables in our food plan every which way I can.

Part of this stems from a documentary binge I’ve wallowed in via Netflix. In the past couple of weeks I’ve watched:

  • Food Matters
  • Food Inc
  • Forks over Knives

I also watched a Vegan thing that frankly went the wrong way for me. Eating processed crap that’s called vegan doesn’t jibe with my own pursuit of hoof-to-head health. But the gluttony of documentaries kept pounding in a simple idea: Eat more vegetables, have fewer health problems.

Vegetarian apologist Joel Furham advocates a simple diet plan that he says cures your bodies ailment: For each 1 lb of raw vegetables, eat 1 lb. of cooked vegetables. He’s taken his fair share of attacks, but nobody gets sick eating more vegetables, and many do get well as Time magazine recently reported. He doesn’t mind much what you do to make the vegetables taste good, knowing that eating that much your tastes for health will align and you won’t be hungry for the crappy stuff that kills you.

This veggie brainwashing has taken hold. I’m still a dedicated omnivore who enjoys my bread and my desserts in moderation. But I now intentionally pack vegetables into my meals, every meal and especially snacks.

All of this is to promote an old school Italian way to get vegetables into your diet: the eggplant.

I use eggplants as much as I can because I love their versatility. For example, as a “pizza” appetizer:

IMG_20140302_162032

Or straight-up on the grill.

Or my favorite, old-school fried eggplant.


Here’s the recipe: It’s easy and it’s fantastic.

Slice them into rounds about 1/2″ thick.

Lay out three bowls, one with flour, one with eggs beaten, one with Italian breadcrumbs.

IMG_20140226_171305

Dunk each round in each bowl in order to fully coat.

Heat a thin layer of olive oil in a cast iron skillet. When warm fry no more than 3 rounds at a time. Don’t crowd them and keep the temp steady on your oil. Drain on a paper towel, lightly dust with sea salt and pepper and Parmesan cheese. Serve with your favorite Marinara sauce.

IMG_20140226_173119

Get those vegetables into your diet anyway you can. Your life depends on it.

Crush the chips craving with kale

If you are truly going to embrace a hoof-to-head lifestyle that puts healthiness at the center of decisions, then you have to deal with the snack thing at some point. You gotta snack. You gotta feed the cravings. You gotta have balance.

That’s why you see some pretty damn good desserts on this site. If we’re going to have something decadent, it aint gonna be a Hostess Ding Dong.

But many cravings can be quelled in healthy ways, as I’ve finally convinced The Bride recently, who has the fiercest potato chip cravings I’ve ever witnessed. That whole “you can’t eat just one” commercial should have starred her. Open a bag, and well, goodnight now, chips!

We needed a better approach.

I’ve been pretty slow to adapt to the kale craze because much like so many of the food fads –I’m talking about you Quinoa — they tend to be overhyped and quickly commercialized. Kale is no exception, but unlike many of the other culprits of social media sensationalism, Kale is a relentless garden favorite that keeps growing all winter long. There is absolutely nothing about planing some seeds in rotation and keeping a steady crop of kale around to pluck and enjoy.

I like its heartiness in salads. I’ve juiced it in my juice experiments, but as one would expect, it doesn’t produce significant yields. All these are just fine. But in kale chips, I’ve finally found something that live up to the hype. By changing the seasoning, from chili powder, to garlic to rosemary to soy, I can get different flavors much like different bags of chips. But unlike chips, these kill it in health instead of kill you with processed crap. Olive oil, garlic and kale — all medicinal foods that together, and cooked just right, taste great.

IMG_20140409_123616

There’s no real magic to making them so don’t get too worked up even if the first time they become road rash to the pan. You’ll slow it down and figure it out.

Here’s a few tips:

  1. Wash the leaves and let dry well even after you’ve spun them in a spinner.
  2. Take the big part of the end of the leaf only in one big chip. Then peel the stems to add to a salad later. The little guys just ain’t worth it and they crowd the pan.
  3. Massage the oil (and if using soy sauce, this asian flavor with a dash of sesame seeds is effin delightful) on the leaves.
  4. Season richly. Strong flavors are good here.
  5. Bake for 12 minutes at 325. About 10 minutes in, I take a spatula and scoop them up from sticking to the pan. It’s like fluffing them up for the final two minutes.
  6. Serve immediately!

DIY laundry detergent saves, cleans and brightens (my day!)

Our recent successful DIY test kitchen experiments left me yearning to try my hand out at any/all DIY experiments. More specifically, I wanted to try out some homemade cleaning products, and laundry detergent seemed like the logical next step. After all my BFF has had success with this for the past six months.

Stacey is pretty much my idol so of course I ventured a pass at it, especially after I recently was able to watch her in action. Turns out that it’s super easy and very inexpensive. Stacey has two very energetic children, one of which goes through wardrobe changes like a diva about to go onto a stage. So you can imagine how she goes through laundry! She told me that she’s only had to refill her detergent once in the past three months. Considering the cost of a single bottle of Meyer’s detergent ($17.98) that lasted less than three months, I was convinced.

I was ready to try it out for myself. Turns out the instructions are super easy, and compared to what it normally costs for a good, store-bought detergent why not try this simple recipe out?

(Effin Artist disclaimer: We had to go to Walmart for the products. I’m still not over it. As we walked in The Bride started mumbling about Walmart’s terrible reputation, their assault on small business, their terrible wages, so I knew we were on the same page. But we are also on the same budget, and many of these products aren’t so easy to find. I’m not saying this to ease my conscience. It’s a full-blown confession. In the future we will consider a better place to shop and perhaps less commercialized ingredients, but the budget being what it is and the timing and… I’ll shut up and go be shamed in the corner and let the Bride get back to her post.)

IMG_20140304_144635

You will need the following items, which can be found in the laundry aisle:

  • One 4lb. 12 oz. box of Borax
  • Three bars of Fels-Naptha soap. You can use any soap of your choice.
  • One 4lb. box of arm & hammer baking soda.
  • One box of arm & hammer super washing soda
  • 4 lbs. of Oxy Clean
  • Laundry softener crystals for scent (i.e. Downy Unstoppables). This last item is optional. I personally, like to add them because it gives the laundry detergent a nice scent.
  • A large 4 gallon, or 5 gallon glass container (or other type container to store the mixed detergent).

Approximate cost for all of these ingredients will set you back about $33 dollars. But, considering that you only need 2-3 tablespoons for each load, this will last awhile. Reread above about my BFF’s diva child daily wardrobe change.

Directions:

Laundry Detergent 1

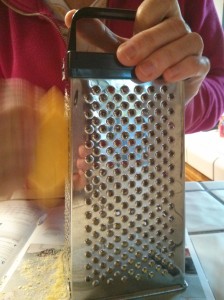
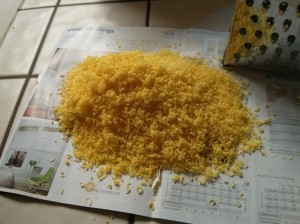
Start with grating (using the small-sized grate) your bars of soap into a bowl.

Laundry Detergent 2
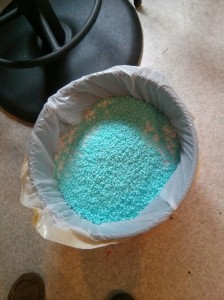
Dump the soap into your container.

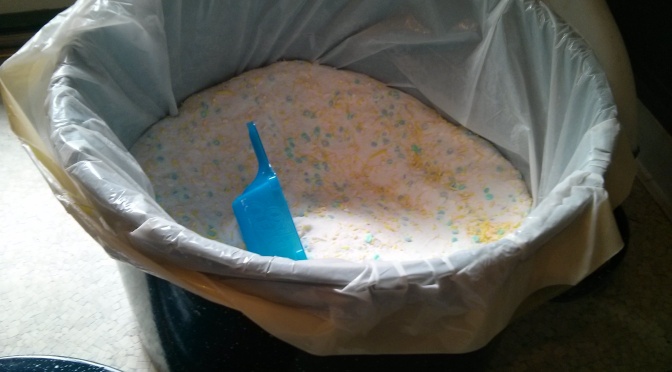
Laundry Detergent 5
Followed by all of your other items.

Mix all ingredients together, and then add to your detergent container as needed.

IMG_20140304_152345

It really is this easy. Now, my BFF chooses to layer and mix the ingredients a little at a time, because dumping it all in at one time can make it quite heavy. I chose to go ahead and dump it all in and then mixed it all together with a really big heavy spoon. Mix however you please.  Give it a try. It’s a savings that I think is worthy of this mention.

Alfredo you can count on at the last minute

After you’ve spent a few hours nurturing and crafting your homemade pasta, the last thing you want to do is labor over the sauce.

That never seems to stop me, because I forget how I don’t want to labor over the sauce. So it is usually the last thing I do. As a result, I’ve developed a fairly straight-forward, very flavorful alfredo that I can whip together — last minute — and not ruin the homemade pasta-making effort.

Here’s the recipe:

Fettuccini Alfredo

Ingredients:

  • 3 tbsp butter
  • 3 garlic clove, minced
  • ½ tsp. chili powder
  • 1/8 tsp. of nutmeg
  • 2 cups heavy cream
  • ½ cup grated parmesan cheese
  • ¾ cup grated mozzarella
  • Splash of fresh lemon
  • Freshly chopped Italian Parsley, basil and sage
  • Salt to taste

Directions

  1. Melt butter in medium pan
  2. Add the garlic, chili powder, nutmeg and sauté for 2 minutes
  3. Add cream and bring to a simmer, stirring often
  4. Add parm cheese and let thicken, about 8 minutes
  5. Stir in mozz cheese, until blended smooth and thick, if too thick add a tbsp of milk
  6. Finish with splash of lemon; fold in fresh herbs until blended. Serve over pasta immediately

Notes: the mozz isn’t essential. It thickens it and gives a soft contrast to the harsher parm, so I use both. But this sauce is pretty good no matter what you toss in it. For example, you can skip the folded herbs and just mix in pesto into the spices before the cream is added and make a creamy pesto. You can use sun-dried tomatoes. You can use chopped green olive. It’s really fun to experiment.

Enjoy.

Recipe: The art of old school fettuccine

A couple of days ago I extolled the virtues of making your own pasta. Then it dawned on me that what if… just what if, someone read that and thought, “you know what?! I’m going to try it.”

I felt an immediate twinge of guilt because I know what lies ahead. Google “making pasta” and you’ll get a ton, A TON, of recipes that say, “it’s so easy!”

Well, it’s not.

But do not be discouraged. Remember the wise wisdom of Jimmy Dugan? Say it with me now, “if it was easy, EVERYONE, would do it! It’s the hard that makes it great.”

So I decided to add one more recipe to the incessant clutter that tries to walk you through the steps of making your own pasta, and to do it realistically.

For starters, let me be specific about this hard/easy thing. It is easy once you get the hang of it. Pasta has only four ingredients. You can’t really screw it up, so even your less-than-Effin-Artistry pastas will taste good. We love eating our failures in the Test Kitchen.

The hard is in the artistry. Learning the feel of the dough. Learning to roll it consistently. Learning how far is too far to let it dry. This is a long recipe that goes into all the pitfalls. You only have to read it once. Then boil down the key parts when you make it. I hope it helps you have an enjoyable successful time of it.

I am still evolving in all of this. But I’m getting better. I keep at it. So follow these steps and enjoy. I couldn’t be more thrilled if you try making dough on account of these posts. And please, click in the reply and let me me know the good, bad and the ugly of your work. If I screw you up here, I want to hear about it!

Let’s get started.

1) Make room. – pasta is not meant to be confined. Clear the counter tops, remove the knicknacks and give yourself a good, clean work space. As you can see here, I have a massive Italian made platter I use and even that doesn’t keep it all contained.

IMG_20140210_123329

Next: pour two cups of flour and a hefty teaspoon of salt in the middle of your work area. Right on the counter is fine, or in a large glass bowl, or like I did on my platter.

IMG_20140210_123821

Then crack two eggs into the well. Let’s take a minute to talk about this well thing. First time I did it, poosh, the hens broke out of the chicken coop and raced down my sloped counter to hide underneath the God forsaken microwave. That’s when I decided to use the platter to guard the eggs from escape. Since then I’ve gotten better at the well. The key is to use your other hand to swoop the edges as you mix the eggs up. It’s a bit tough to explain, but as you slowly whip the eggs you incorporate part of the dough with the right hand. With the left you push up the edges of the well to keep it all contained. If you run out of room, push down in the middle of the well to compact it a bit and have it all sink down deeper into the well. Make sense? If not, reply below and I’ll make a video or something. It’s not hard… just takes practice! Or maybe I’m just a slow learner.

Next, put four tablespoons of hot water into the well. (Remove your rings… they get all buggered from the dough and never clean up right). Now push from the outer edges into the middle. I use my fingers like a rake dragging the thing into a pile like I’m piling up leaves. It gets a bit messy here, which is really fun. Once it starts to come together start to shape a ball. I like to add two more tablespoons of water here just to make sure it all incorporates. I prefer sticky dough to dry because its easier in my opinion to add flour as I knead it then it is to add water.

Next, knead.

Next, knead.

Next, KNEAD. A word about kneading. A mindset is needed when it comes to kneading. This is the stuff. This is not a chore. Don’t try to avoid it. Embrace it. Get those hands working, smooshing and bashing and pulling and patting and let your mind fly to whatever heights it needs to climb, unfettered by the chaos of the day. So many recipes try to avoid kneading. They use food processors and dough hooks and “no-knead” tricks. But kneading is just playing with Play-Doh, which we did for hours as a kid.

I’d go about ten minutes. There’s no specific time here. This is the thing that will evolve over time. Eventually you’ll notice the dough turns more silky than grainy and that’s what you want.

NEXT: This is important if you ask me and I’ve never seen it explained in a recipe. Make a dough ball. Sounds easy I know, but when I was 15 and worked in a Mafia-owned pizza parlor, they wanted the dough a certain way and we made sure we did it the way THEY WANTED IT. Turns out this was important. They wanted it with no broken edges so when you toss out the pizza, the crust stays together. To do this you have to form a good, cohesive dough ball. I liken it to tying off a balloon. Wrap your right hand thumb and forefinger in a loop around the mid-section of your dough ball. Then softly twist the dough in your hand as you bring your thumb and finger together toward the top of the dough ball. You’ll end up with what looks like the end of a balloon at the top. Push this into the dough and smooth it out. Whaalla. You’ll have a seam-free dough ball. (If someone is so gracious as to try this, please contact me and let me know if this A) made sense, and B) worked?!)

IMG_20140210_130128

Now take the dough and wrap it in plastic for an hour. This is perfect break time, which as you can see above, I used to make a powerhouse energy smoothie! Delish.

An hour later break out the pasta roller. I prefer the kind here, a simple old-timey gizmo with a hand crank. I know there are all kinds of motorized ones, but I like my dough to be machine-free. Here’s where you take advantage of all that space you cleared. Divide your dough balls into six different ones all about the same size and weight in your hand. You can feel that they are close enough. I again go back and make perfect little dough balls,”tied” off at the top, six more times because I like playing with dough and those scary pizza parlor guys banged it into me.

Once you have the dough balls cover them back up with the plastic wrap to keep them from drying out while you work the dough into sheets.

The basics of working into sheets is straight forward. Set the machine to the widest slot and run the dough ball through four times. This just wakes up the dough. I have learned to take a bit of care to send it through the machine straight. This helps keep the sheets straight at the end. Ruler straight isn’t necessary. Some waggle is fine and creative looking. We’re not machines. Our pasta should reflect it. Crank the machine down a notch at a time until you get to the second notch. Now you’ll have a nice long sheet of pasta running from one hand through the crank and caught by the other hand. Lay it out on the platter or counter or hang from the rack and dust it in flour. DONE! (Note: I’ve done some stopping at the third notch so they have a bit more chew and actually I like it. But officially, whatever that is, fettuccine is supposed to be on number 2. You decide!)

Do this five more times with the next five balls. If something goes awry don’t sweat it. Mash it all back into a ball and start over. It’s pretty forgiving.

IMG_20140210_145544

Notice I’m using a pasta rack to dry the noodles, but you don’t have to. I go back and forth. I prefer to just lay them on my platter, dust them with flour and put a tea towel (tea towel… HA… I’ve been reading too many recipes. What the hell is a tea towel? I use dish rags my daughter dyed to make pretty) over them. But I do use the rack too. Either way. (Shrug). In fact, I used both ways this time.

Here’s one of those key things they don’t tell you. You want the dough to sit a bit before you cut it. It stiffens which makes it easy to cut and less sticky when you’re done. BUT don’t let it get hard. Stiff, but not hard. Got it? Probably not, but once you do it a couple of times you will. Hard will crack and splinter going through the cutter. Stiff will cut delightfully.

One at a time slide the pasta sheets through the cutter part of your pasta roller. (If you want to be artsy here you can cut them with a big chef’s knife and make them different widths, which is pretty cool, but eh… I like the crank-y cutter thing). I like to drape the pasta off the machine so I can crank with one hand and catch the pasta with the other. This is not necessary. You can let it all drop as it cuts. But I like to catch it so I can lay it out on the big platter and dust a bit more flour on it so it all doesn’t stick. When I do this I feel like I’m being unnecessarily anal. So take it for what it’s worth.

IMG_20140210_163100

Once its all cut put some flour on your hands and riffle through the pasta lightly letting it all fall spread out on the platter or counter or a baking pan, sort of like your fluffing through hair. This helps the sticky ones fall apart and keeps them from globbing up in the water.

Now the water. Let’s get serious here. This is important. Don’t use a small pan. I don’t get this whole chuck pasta in water and that’s all there is to it thing. You need a big pan of water. You need a pretty healthy pile of sea salt. You need that water to get to a roiling boil. Don’t do anything until you have those three things. Then you slide your noodles into the water, give them a swirl and let them be for about three minutes.

Take a 1/2 cup of the starchy water out of the pan before you dump it. Then strain the noodles. Don’t rinse them because the starch helps the sauce stick.

Then put the noodles back in the big pan and let them just briefly feel the heat of the bottom of the pan. Then put some of the reserved water as they cook. Next add the sauce and let it heat together for a minute before serving.

Sauce? What sauce you say?

I’m glad you asked. Check back in a couple of days for a good Alfredo sauce recipe.

Peanut Butter revisted: a must-do DIY staple

A while back I spent a week in the test kitchen focused on peanut butter, but I mostly skimmed past it in on the blog, lost in the fury of the Croissonut Craze that turned my family email chain into a WWE tussle we’re still recovering from. It wasn’t pretty, I’ll tell you that. Nevertheless a deserving winner arose from the abyss and enjoyed a sweet package of Croissonut goodness for her efforts.

Now that that’s over (for now- stay tuned for Valentine Cronuts) let’s revisit the peanut butter testing, which turned out to be a true keeper. I have simply realized I will never buy peanut butter again.

There are few things I just won’t buy, period. Spaghetti sauce. Won’t happen. Salsa, nope. Beans are starting to move toward that list, but in a crunch I’d probably break down and buy a can. As much as I love my pasta, I’ll buy some for convenience.

Peanut butter has now joined that list. I see absolutely no earthly reason to ever buy it again. We ran out the other day — no small thing because I eat peanut butter on everything. But rather than dash out and buy a jar to tide me over, I went through my test kitchen supplies and found a tupperware container of peanuts. Ten minutes later I had peanut butter. The cost is easily half that of a store-bought jar, more so of the really good peanut butters.  As I explained before the recipe can’t get any easier. Here it is again:

Get peanuts, toss em in a food processor and whirl the heck out of them for six minutes. Done.

You can get a bit creative and I have, slowly working toward my own concoction that will forever be EFFinArtist Peanut Butter. But you’d be a dolt to ever try to buy it from me as you can and SHOULD make your own, and it will be every bit as good as mine or Adams or Skippy or any other jar you can buy.

If there are better things in life than a Effin Artist brownie dunked in a jar of Effin Artist peanut butter, I don’t what it is, at least not right now (as I wipe the gooey brownie flecked peaut butter from my keyboard). What’s that you say about weight loss? We’ll revist that in another post, thank you very much.

There’s no excuse. Make yourself some peanut butter today. You’ll thank me.

A match made in web heaven — Rosemary Apple Rings

When I enter my kitchen, I am happily surrounded by my roots. Every day I am reminded of who I am.

My grandparents worked from poverty to affluence by spending decades, six nights a week cooking in their restaurant. It started as little more than a pool hall in an out-of-the-way town on the Redwood coast of California.

IMG_20140120_104957

Then it grew. They moved it and built a place that would become a regional favorite.

IMG_20140120_103711

As a child, my grandmother babysat my brother and me in her kitchen. I am proud of the splatter-burn scars on my foot I picked up one day in her kitchen, though I’m sure Nonie and my parents were none to pleased to have a toddler howling like a devil with a burn on his foot. I’m glad it happened; it’s a momento to my heritage.

The Big 4 Inn was a Northern California landmark. When my grandmother finally sold out to make way for Interstate 5, the San Francisco Chronicle documented its passing into history. The menus and the napkins and photos of the Big 4 still decorate my kitchen. The recipes are the staple of my cooking, the heritage I pass along to my children and know they will pass along to theirs (if they’d ever buckle down and give me grandkids, damnit).

The Big 4 was beloved, Twenty years after it closed I met a guy in passing in another state. We swapped a few stories. We were both italian. We both had roots in Humboldt County. I mentioned the Big 4. His jaw dropped.

“My God, that was your nona?” he said.

I nodded proudly.

“I swear to God I still taste those raviolli’s in my mouth. I can still taste them, you know. Do you unnerstand?”

I did. I still do to. It was that kind of place.

As an appetizer my grandparents served apple rings with every dish. I grew up on these apple rings. Something about them, to me, goes perfect with the heavy meat sauce Nonie Mary was known for and I still do my best to replicate.

Anyway, I say all this becase I decided to bring back the apple rings the other day when I entered a contest to win some olive oil from my latest WeBromance. I mentioned there were two contests. Nudo’s rosemary olive oil and Nonie’s apple rings seemed like a match made in heaven.

For those keeping score at home, here is my entry in the second one. Try it. The apple rings are wonderfully simple and you’ll experience a small taste of what made The Big 4 Inn truly a magical place.

Rosemary infused apple rings.
Ingredients :
– Nudo Italia Rosemary olive oil
-Four granny smith apples, peeled and cored.
-1 cup 00 flour
– up to 1/4 cup 1/2 n 1/2 cream
-1 egg
– 1 tsp vanilla
-1 tsp salt, a dash of dried rosemary
– confectioner sugar for dusting

Directions
1) put flour in a bowl and create a well. Mix in a hint of dried rosemary.
2)crack egg into the well along with salt and vanilla.
3) use a fork to mix egg gradually incorporating some of the flour.
4) slowly add in cream until batter forms. Should be like pancake batter. Use a couple of tbls of milk if it’s too thick.
5) heat olive oil in a skillet on medium.
6 ) slice apples about 1/2 inch thick. Coat the apples in the batter holding aloft to allow excess to drain off.
7) put apples gently into heated oil. Cook until lightly browned on both sides. Transfer to a paper towel. Lightly dust with confectioner sugar. Repeat until all the rings are cooked.
8) arrange on a platter in a circle. Scoop ricotta cheese into the center for optional topping.
9) serve while still warm.